Form Help
1. Profile details
Your name
Enter you full name or you nickname.
Your e-mail
Enter one of your e-mail addresses here that you will be using to edit the profile later one. Check the box if you don't want to show the e-mail address publicly.
Verification code
Type the code that is shown in the image in the field to the right. This is used to prevent spambots and malicious entries to enter the database.
2. Computer details
Select base model
In this drop-down meny box you should select the original stock model that you picked when you bought the machine, without any upgrades applied. Apple usually will have only 2-3 different configurations available for each of their computer system at any given time. Try to find the model number and use this to select the correct model. It can usually be found inside the battery bay.
When choosing one of the options, the form will automatically fill the other fields with the appropriate spesification for that particular model. If you have upgraded the CPU speed or the hard drive from the original configuration, you have to update the corresponding fields with the correct information.
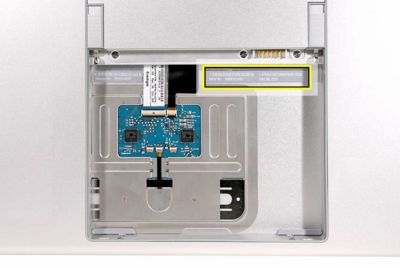
Serial number
Every Mac has a serial number located either on the back fo the machine or in a eeprom chip on the circuit board. On notebooks you usually find the printed serial underneath the battery near the memory slots, read more MacBook / MacBook Pro. On iMacs the serial number is printed under the iMac foot, read more. On Mac minis it's at the bottom edge of the case housing, read more.
The eeprom serial can be found by clicking on the Apple logo in the top-left corner, select About This Mac, and click on the Mac OS X version number under the Mac OS X text logo a couple of times. You only need to enter the 5 first characters. This is enough to reveal manufacturer date.
 |
 |
CPU frequency
This is the advertised CPU speed of the computer. If you have upgraded the CPU you have to correct this value from the original configuration.
Memory
This is the total amount of system memory you have available on the computer. If you have upgraded RAM sticks or inserted a new one you have to correct this value from it's default configuration.
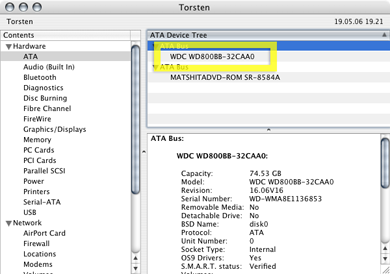
Hard drive brand
This is the make of the hard drive installed in the computer. If you chose a bigger hard drive when you bought it you have to correct the value with new brand. You can find the brand of the hard drive by starting the System Profile in the Utilities folder, and click on the ATA option on the left. The first entry is the model number and you can Google this number to find the brand.
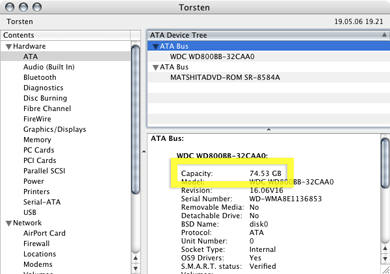
Hard drive size
This is the total advertised disk size. Don't confuse this with the total operating system disk size, which is lower. You can also find this in the System Profiler, look at the "Hard drive brand" help for more information. Usually you can round the number up to the closest 60, 80, 100, 120, 160 GB to get the real disk size.
Hard drive rpm (rotations per minute)
This is how many rotations the disks inside the hard drive is spinning. You can find this by looking up the model number on Google or looking at your receipt.
Mac OS X version
After you've downloaded and installed all the available updates, you should click on the Apple logo in the top-left corner and select About This Mac. The version number is displayed right under the Mac OS X logo text and above the Software Updates button.

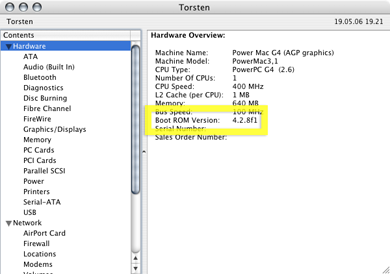
System firmware version (boot rom)
For the machine power on and boot up the machine needs to run some low-level boot code to allow the software to speak to the hardware. This is called the firmware or boot rom and is stored on a seperate chip on the circuit board. Once in a while Apple is releasing firmware upgrades that requires special install prodecures. You can find the current version by starting the System Profiler in the Utilities folder, and look under the Hardware option and Boot ROM version.
SMC (System Managment Control) version
This is the version of the firmware that controls the computers power and thermal systems. You can find the version number in the System Profiler, in the same tab as the firmware version mentioned above.
Audiable whine issue (MacBooks only)
A few of the first revisions of the MacBook Pro had problems with a power invert and made an annoying whine or buzzing noise. If you have this issue and haven't already returned the computer, select the Yes option.
Fan moo whine issue (MacBooks only)
The first new MacBooks apparently has an issue with fan noise, also described as mooing. If you have this issue and haven't already returned the computer, select the Yes option. Watch this video to figure out if you suffer from mooing.
3. Temperatures
I have followed the policies
This checkbox makes sure that you submit temperatures in accordance with the Howto policies. Especially that you have the power MagSafe adapter plugged in (it makes an difference in the temperature).
Measued in
Select the appropriate temperature scale that you used to record the values.
Ambient / room temperature
This is the ambient temperature in the room where where you conducting the measurements. It's recommended that you find a room with temperatures around 20 °C.
Idle temperature
On a stock factory configured machine, this is the temperature when the computer is doing nothing and CPU usage is around 0-1%. Make sure to follow the recommended measurements practices mentioned on the Howto page.
Load temperature
On a stock factory configured machine, this is the average temperature after 10 minutes with absolute 100% CPU usage. Intel Core Duo processors, as the name suggests, have two computing cores and you have to make sure both cores are being utilized 100%. Make sure to follow the recommended measurements practices mentioned on the Howto page.
HDD temperature
All modern hard drives come with a monitoring system called S.M.A.R.T that is continously looking after the disk and will give you an estimate if the drive is about to fail. In addition there is a temperature sensor that will tell you how hot the drive is running. Record the temperature immediately after load temperature measurement.
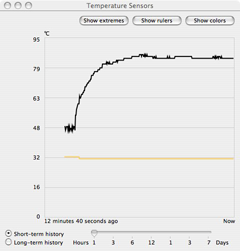
Screenshot of load graph
With this option you have the opportunity to upload the histogram image from Hardware Monitor. This will let users see the raise in temperature when the CPU load was full, when the fans kick in, and the descent when cooling down. In addition the hard drive temperature.
You can use the Grab application in the Utilities folder to capture an image of the graph like shown below. Select Capture and Window, go back to the Hardware Monitor window, then click Choose Window and click once more on the Hardware Window to capture it. Save it as tiff.
Open the file in Preview and save it as PNG.
DISCLAIMER: I do NOT recommend that you disassemble your computer and apply thermal grease if you still want your warranty to be intact. Make sure you have the expertise to work with electronic components before opening the machine.
Idle temperature after fix
If you've applied thermal grease fixes or improved the cooling system you need to seperately report the new temperatures in this field. Look at the "Idle temperature" help entry above for further information.
Load temperature after fix
If you've applied thermal grease fixes or improved the cooling system you need to seperately report the new temperatures in this field. Look at the "Load temperature" help entry above for further information.
HDD temperature after fix
Usually after applying a fix to the thermal cooling system the rest of system is also affected by the changes. The hard drive could therefore run somewhat cooler or warmer depending on how much heat is dispensed. Enter the new value reported by the S.M.A.R.T system.
Screenshot of load graph after fix
With this option you have the opportunity to upload the histogram image from Hardware Monitor. This will let users see the raise in temperature when the CPU load was full, when the fans kick in, and the descent when cooling down. In addition the hard drive temperature.
You can use the Grab application in the Utilities folder to capture an image of the graph like shown below. Select Capture and Window, go back to the Hardware Monitor window, then click Choose Window and click once more on the Hardware Window to capture it. Save it as tiff.
Open the file in Preview and save it as PNG.
4. Closing comments
Comments
In this text field you should write all about your experience with the computer and how you measured the temperatures, like:
- When does the fans kick in, how load are they?
- Is the external case temperature to hot to touch?
- How fast does it cool down after max load?
- What are the version numbers of the monitoring programs?
- How long did it take to reapply the thermal grease?
- Give me suggestions what to put here...
|